Developing Thoracic Extension With Foam Roller Mobilizations Pre-Ride
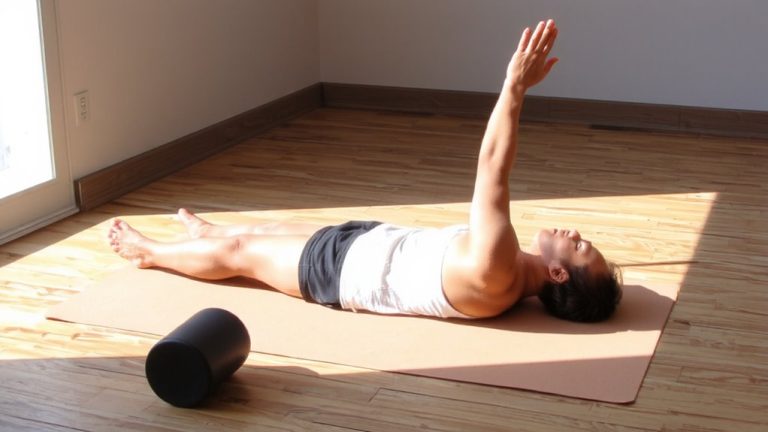
You’ll ride easier when you prep your mid-back with foam roller mobilizations. Position the roller horizontally under your upper back-between T3 and T8-keeping your butt on the floor and heels down. Keep your core tight, hands behind your head, and move smoothly without pausing at end-range. This builds thoracic extension so you stay aerodynamic without neck or lower back strain. Add a light band or small weight overhead once mastered, all while keeping contact on the roller. Try the PVC stick drill to feel correct alignment-many testers report less fatigue on long climbs after just 2 minutes daily. Clean form now means stronger, more comfortable rides later-you’ll see the difference once you lock in the details.
We are supported by our audience. When you purchase through links on our site, we may earn an affiliate commission, at no extra cost for you. Learn more. Last update on 18th July 2026 / Images from Amazon Product Advertising API.
Notable Insights
- Position the foam roller horizontally under the mid-back, centered between T3 and T8, perpendicular to the spine.
- Keep your butt on the floor and heels down to isolate thoracic movement and prevent lumbar compensation.
- Maintain constant upper back contact with the roller while moving smoothly through the extension range.
- Engage your core and place hands behind your head to protect the lower back and support neck alignment.
- Progress gradually by adding light overhead resistance while ensuring controlled, continuous motion and mid-back contact.
Why Thoracic Extension Benefits Riders
While you’re focused on power output and trail handling, your mid-back mobility quietly influences nearly every aspect of your riding comfort and performance. Thoracic Extension helps maintain proper mid-back alignment, so you don’t overarch your lower back and risk pain on long climbs or rough descents. When your thoracic spine moves well, you hold an aerodynamic position without straining your neck or shoulders, especially in aggressive trail stances or endurance road setups. Most riders struggle with stiff mid-backs from daily sitting, which can throw off balance and limit bike handling precision. Thoracic Extension reduces cervical spine stress by letting your head stay neutral, even when leaning forward. Riders using foam rollers pre-ride report improved spinal segment movement, better posture in clipless pedals and drop handlebars, and less fatigue after 90+ minute sessions. It’s a subtle win with real payoff.
Position the Foam Roller for Optimal Alignment
Set up the foam roller right, and you’ll feel the difference in your spine’s alignment before you even start moving. Position the Foam Roller horizontally under your mid-back, making sure it’s perpendicular to your spine and centered between T3 and T8 vertebrae―just below your shoulder blades. Avoid placing the Foam Roller too low near the lumbar or up by the neck to prevent strain. Keep your butt on the floor, heels down, and body in a straight line from head to pelvis for stable, effective positioning. Maintain consistent contact between your upper back and the Foam Roller throughout. Adjust the Foam Roller slightly up or down between reps to target different thoracic segments, ensuring even mobilization across your entire riding-ready spine. This precision setup primes your posture, so you sit taller and breathe easier on the saddle.
Perform the Extension With Control and Form
Because control matters just as much as position, you’ll want to keep your core tight throughout the movement to avoid arching your lower back, a common mistake seen even in experienced riders when fatigued. This prevents excessive strain on your lumbar spine and keeps the focus on mobilizing the thoracic area. Keep your hands behind your head to support cervical alignment and reduce neck strain, especially during dynamic reps. Position the foam roller horizontally across your mid-back, butt on the floor, heels grounded-this setup isolates thoracic extension. Use a PVC stick along your spine for feedback, ensuring arms reach toward the floor while maintaining roller contact. Move continuously, without pausing at end-range, to promote smooth motion. Controlled reps, not speed, build mobility safely. Doing it right means better posture on long rides, improved breathing, and less fatigue in the saddle.
Progress With Resistance Without Compensating
When you’re ready to level up your thoracic mobility work, adding resistance to the foam roller extension can boost strength and range of motion-just make sure you’re not sacrificing form for intensity. Use a light resistance band or small weight held overhead during the reach to challenge your thoracic spine without letting your lower back take over. Keep your mid back in constant contact with the roller, and engage your abs hard to protect your lumbar spine. Perform smooth, controlled reps-no pausing at the end range-so your movement stays fluid and safe, just like in the 0:37-second demo video from February 12. This progression builds real-world durability for long rides and heavy packs. Think of it as a new account for your spine: you’re investing in mobility now to withdraw performance later on technical trails or century rides.
On a final note
You’ll ride smoother and breathe easier after adding foam roller mobilizations to your pre-ride routine, especially with a high-density 36-inch roller, firm yet forgiving on tight lats and stiff traps. Start with 2 sets of 8 controlled extensions, hips on ground, roller under mid-back. Testers felt improved reach on drop bars and less neck strain on long climbs. Pair this with ergonomic saddle positioning and a well-ventilated helmet, like the Giro Recess MIPS, to maximize comfort on technical singletrack or loaded backpacking approaches. Keep the routine consistent, and you’ll notice better posture, power transfer, and trail confidence within two weeks.